.
1) Startup

2) What makes the texts come out?
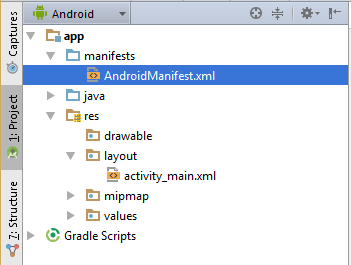
2.1) Observe AndroidManifest.xml
Find the statement android:label="@string/app_name"
Try: edit the code so that you see a new text “My First Apps” .

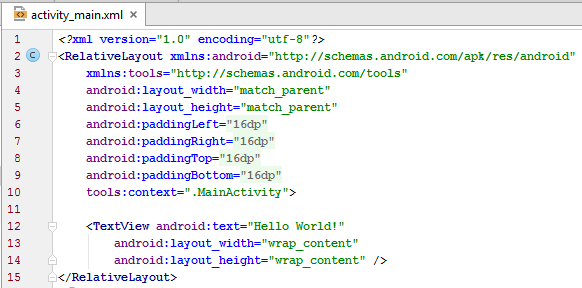
2.2) Observe the file activity_main.xml
Find the statement TextView android:text="Hello World!"
Try: edit the code so that you see a new text “Hola Mundo” .
(Hola Mundo is Hello World in Spanish)
3) Add EditText and Button objects
Add codes as follows.
File Name: activity_main.html
<?xml version="1.0" encoding="utf-8"?>
<RelativeLayout xmlns:android="http://schemas.android.com/apk/res/android"
xmlns:tools="http://schemas.android.com/tools"
android:layout_width="match_parent"
android:layout_height="match_parent"
android:paddingLeft="@dimen/activity_horizontal_margin"
android:paddingRight="@dimen/activity_horizontal_margin"
android:paddingTop="@dimen/activity_vertical_margin"
android:paddingBottom="@dimen/activity_vertical_margin"
tools:context=".MainActivity">
<TextView android:text="Hello World!"
android:layout_width="wrap_content"
android:layout_height="wrap_content" />
<EditText android:id="@+id/edit_name"
android:layout_width="wrap_content"
android:layout_height="wrap_content"
android:hint="Type name" />
<Button
android:layout_width="wrap_content"
android:layout_height="wrap_content"
android:text="Send" />
</RelativeLayout>
|
If you switch to Design Mode, you see the following output.
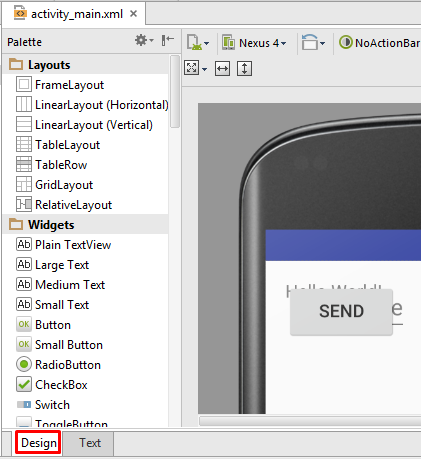
The objects are stacked on top of the other.
4) Linear Layout (horizontal)
Replace the word Relative with Linear.
Add another statement for horizontal orientation
File Name: activity_main.html
<?xml version="1.0" encoding="utf-8"?>
<LinearLayout xmlns:android="http://schemas.android.com/apk/res/android"
xmlns:tools="http://schemas.android.com/tools"
android:layout_width="match_parent"
android:layout_height="match_parent"
android:paddingLeft="@dimen/activity_horizontal_margin"
android:paddingRight="@dimen/activity_horizontal_margin"
android:paddingTop="@dimen/activity_vertical_margin"
android:paddingBottom="@dimen/activity_vertical_margin"
android:orientation="horizontal"
tools:context=".MainActivity">
<TextView android:text="Hello World!"
android:layout_width="wrap_content"
android:layout_height="wrap_content" />
<EditText android:id="@+id/edit_name"
android:layout_width="wrap_content"
android:layout_height="wrap_content"
android:hint="Type name" />
<Button
android:layout_width="wrap_content"
android:layout_height="wrap_content"
android:text="Send" />
</LinearLayout>
|
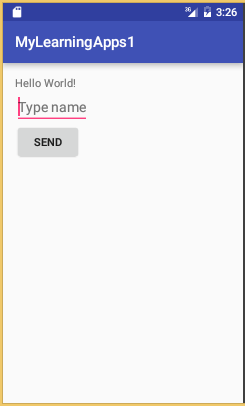
You get a better output.

5) Linear Layout (vertical)
Change the orientation value to vertical
File Name: activity_main.xml
<?xml version="1.0" encoding="utf-8"?>
<LinearLayout xmlns:android="http://schemas.android.com/apk/res/android"
xmlns:tools="http://schemas.android.com/tools"
android:layout_width="match_parent"
android:layout_height="match_parent"
android:paddingLeft="@dimen/activity_horizontal_margin"
android:paddingRight="@dimen/activity_horizontal_margin"
android:paddingTop="@dimen/activity_vertical_margin"
android:paddingBottom="@dimen/activity_vertical_margin"
android:orientation="vertical"
tools:context=".MainActivity">
<TextView android:text="Hello World!"
android:layout_width="wrap_content"
android:layout_height="wrap_content" />
<EditText android:id="@+id/edit_name"
android:layout_width="wrap_content"
android:layout_height="wrap_content"
android:hint="Type name" />
<Button
android:layout_width="wrap_content"
android:layout_height="wrap_content"
android:text="Send" />
</LinearLayout>
|

Run.
6) Add ImageView

Save the image as “smiley.png” in the res/drawable folder.
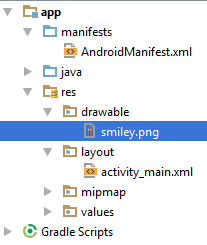
Edit the layout file.
File Name: activity_main.xml
<?xml version="1.0" encoding="utf-8"?>
<LinearLayout xmlns:android="http://schemas.android.com/apk/res/android"
xmlns:tools="http://schemas.android.com/tools"
android:layout_width="match_parent"
android:layout_height="match_parent"
android:paddingLeft="@dimen/activity_horizontal_margin"
android:paddingRight="@dimen/activity_horizontal_margin"
android:paddingTop="@dimen/activity_vertical_margin"
android:paddingBottom="@dimen/activity_vertical_margin"
android:orientation="vertical"
tools:context=".MainActivity">
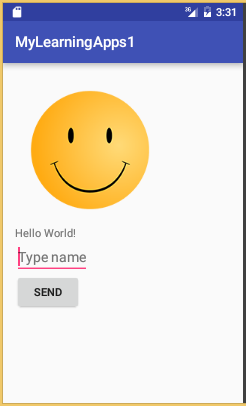
<ImageView
android:layout_width="wrap_content"
android:layout_height="wrap_content"
android:src="@drawable/smiley"/>
<TextView android:text="Hello World!"
android:layout_width="wrap_content"
android:layout_height="wrap_content" />
<EditText android:id="@+id/edit_name"
android:layout_width="wrap_content"
android:layout_height="wrap_content"
android:hint="Type name" />
<Button
android:layout_width="wrap_content"
android:layout_height="wrap_content"
android:text="Send" />
</LinearLayout>
|
Run.
7) Center Objects
File Name: activity_main.xml
<?xml version="1.0" encoding="utf-8"?>
<LinearLayout xmlns:android="http://schemas.android.com/apk/res/android"
xmlns:tools="http://schemas.android.com/tools"
android:layout_width="match_parent"
android:layout_height="match_parent"
android:paddingLeft="@dimen/activity_horizontal_margin"
android:paddingRight="@dimen/activity_horizontal_margin"
android:paddingTop="@dimen/activity_vertical_margin"
android:paddingBottom="@dimen/activity_vertical_margin"
android:orientation="vertical"
android:gravity="center_horizontal"
tools:context=".MainActivity">
<ImageView
android:layout_width="wrap_content"
android:layout_height="wrap_content"
android:src="@drawable/smiley"/>
<TextView android:text="Hello World!"
android:layout_width="wrap_content"
android:layout_height="wrap_content" />
<EditText android:id="@+id/edit_name"
android:layout_width="wrap_content"
android:layout_height="wrap_content"
android:hint="Type name" />
<Button
android:layout_width="wrap_content"
android:layout_height="wrap_content"
android:text="Send" />
</LinearLayout>
|
Run.

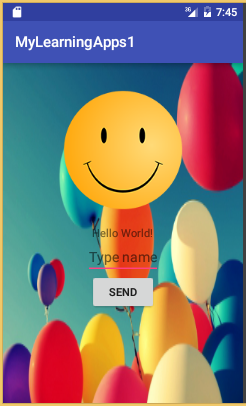
8) Insert Background
Save the following image as balloons.jpg in res/drawable folder.

File Name: activity_main.xml
<?xml version="1.0" encoding="utf-8"?>
<LinearLayout xmlns:android="http://schemas.android.com/apk/res/android"
xmlns:tools="http://schemas.android.com/tools"
android:layout_width="match_parent"
android:layout_height="match_parent"
android:paddingLeft="@dimen/activity_horizontal_margin"
android:paddingRight="@dimen/activity_horizontal_margin"
android:paddingTop="@dimen/activity_vertical_margin"
android:paddingBottom="@dimen/activity_vertical_margin"
android:orientation="vertical"
android:gravity="center_horizontal"
tools:context=".MainActivity"
android:background="@drawable/balloons">
<ImageView
android:layout_width="wrap_content"
android:layout_height="wrap_content"
android:src="@drawable/smiley"/>
<TextView android:text="Hello World!"
android:layout_width="wrap_content"
android:layout_height="wrap_content" />
<EditText android:id="@+id/edit_name"
android:layout_width="wrap_content"
android:layout_height="wrap_content"
android:hint="Type name" />
<Button
android:layout_width="wrap_content"
android:layout_height="wrap_content"
android:text="Send" />
</LinearLayout>
|
Run.

No comments:
Post a Comment