.
MyBuddies103: ListView ArrayAdapter Add Update Notify Data Set Changed
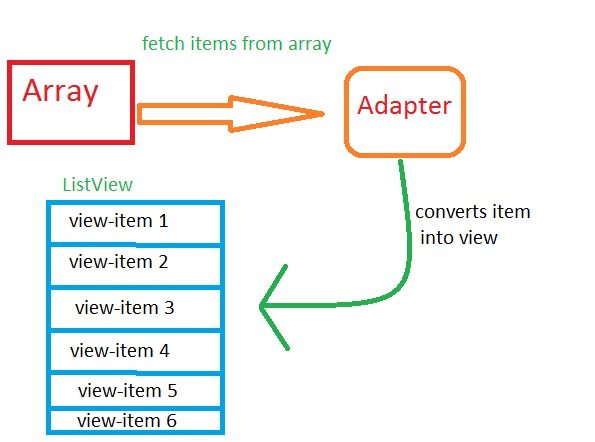
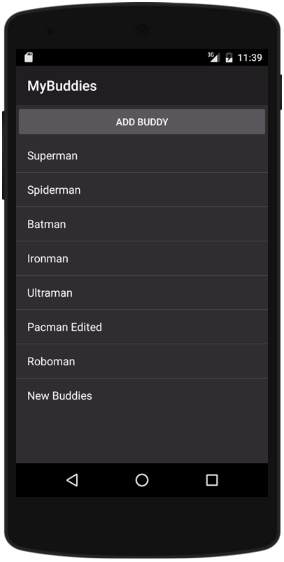
We want to change the ListView content in two ways; add new item to the bottom of the list (when the user taps ADD BUDDY button) and change the existing item in the list (when the user taps the list item)
|
package com.example.MyBuddies;
import android.app.Activity;
import android.os.Bundle;
import android.widget.Button;
import android.widget.ListView;
import android.widget.TextView;
import android.view.View;
import android.widget.AdapterView;
import android.widget.ArrayAdapter;
import android.widget.Toast;
import java.util.ArrayList;
import java.util.Arrays;
import java.util.List;
public class MyBuddies extends Activity
{
Button btnAddBuddy;
ListView lvwBuddies;
String[] strBuddies;
ArrayAdapter adpBuddies;
/** Called when the activity is fit created. */
@Override
public void onCreate(Bundle savedInstanceState)
{
super.onCreate(savedInstanceState);
setContentView(R.layout.main);
setBtnAddBuddy();
setLvwBuddies();
}
private void setBtnAddBuddy(){
btnAddBuddy=(Button) findViewById(R.id.btn_addbuddy);
//set onlicklistener for button
btnAddBuddy.setOnClickListener(new View.OnClickListener() {
public void onClick(View v) {
addBuddy();
}
});
}
private void setLvwBuddies(){
lvwBuddies = (ListView) findViewById(R.id.lvw_buddies);
//Add new values to array
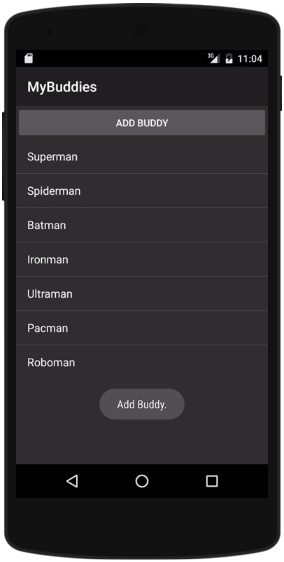
strBuddies =new String[] {"Superman","Spiderman","Batman","Ironman","Ultraman", "Pacman", "Roboman"};
//Create ArrayList from strBuddies
List<String> values = new ArrayList<String>(Arrays.asList(strBuddies));
//Create Adapter to load ArrayList
adpBuddies = new ArrayAdapter<String>(this, android.R.layout.simple_list_item_1, values);
//Plug adpBuddies to lvwBuddies
lvwBuddies.setAdapter(adpBuddies);
//set onclick listener for listview
lvwBuddies.setOnItemClickListener(new AdapterView.OnItemClickListener() {
@Override
public void onItemClick(AdapterView<?> parent, View view, int position, long id) {
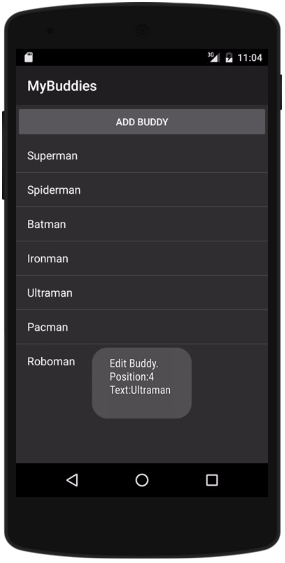
editBuddy(position, ((TextView) view).getText().toString());
}
});
}
private void addBuddy(){
//Toast.makeText(getApplicationContext(),"Add Buddy.",
// Toast.LENGTH_SHORT).show();
adpBuddies.add("New Buddies");
adpBuddies.notifyDataSetChanged();
}
private void editBuddy(int position, String text){
//Toast.makeText(getApplicationContext(),"Edit Buddy.\nPosition:"+position+"\nText:"+text+"\n",
// Toast.LENGTH_SHORT).show();
adpBuddies.clear();
//Edit values in array
for(int i = 0;i<strBuddies.length; i++) {
if (i!=position) { adpBuddies.add(strBuddies[i]);}
else {adpBuddies.add(text + " Edited");}
}
adpBuddies.notifyDataSetChanged();
}
}
|
OUTCOME.
DOWNLOAD
.