.
103-Programmr: Using Image Resources In Android
In this tutorial, we will be dealing with three situations in which image resources are applied to Android projects; 1) as App Icon, 2) as ImageView resource and 3) as View background resource
|
0) Starting Up
Continue from the previous tutorial, http://android-steps.blogspot.my/2015/01/102-programmr-edit-layout-for-android.html
1) Image as an App Icon
If you browse your apps through the Apps Window, you would be able to find your apps with the icon shown below
|

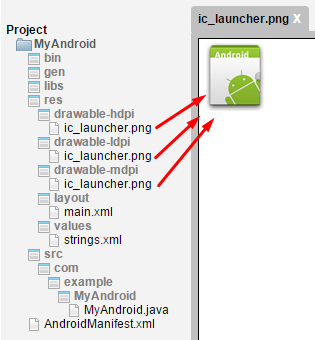
The icon comes from the ic_launcher.png file that is stored in the drawable folder.
The name is actually specified in AndroidManifest.xml.
Notice that we may have several drawable folders ending with “-hdpi”, “-ldpi” and “-mdpi” respectively. Android OS will select the file based on its screen specification e.g a low density spec device will use the drawable folder ending with “-ldpi”.
|
<?xml version="1.0" encoding="utf-8"?>
<manifest xmlns:android="http://schemas.android.com/apk/res/android"
package="com.example.MyAndroid"
android:versionCode="1"
android:versionName="1.0">
<application android:label="@string/app_name" android:icon="@drawable/ic_launcher">
<activity android:name="MyAndroid"
android:label="@string/app_name">
<intent-filter>
<action android:name="android.intent.action.MAIN" />
<category android:name="android.intent.category.LAUNCHER" />
</intent-filter>
</activity>
</application>
<uses-sdk android:minSdkVersion="8" />
</manifest>
|
Let’s say we want to change the image into something else, e.g a smiley image.
Download the smiley image below from this linkhttps://upload.wikimedia.org/wikipedia/en/6/6f/Smiley_Face.png .
|

In order to produce the various file sizes for the each drawable folders, we will use a websitewww.makeappicon.com
Drag the image from your computer into the bread toaster image on the webpage.
After some time, new images will be created according to the standard Android icon image sizes.
|


mdpi
|
hdpi
|


Put the files into their respective folders.
Notice that this website does not generate the file for ldpi. Skip the folder for now.
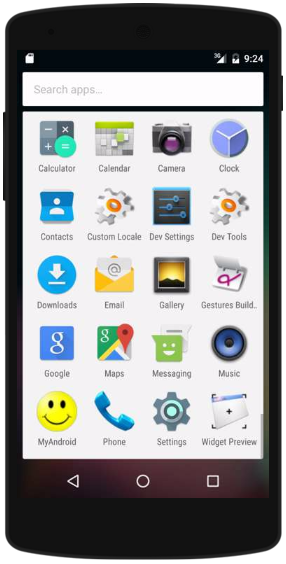
Run your apps.
You should be able to see the Smiley icon.
|
2) ImageView Source
Android has an ImageView object that is used to display image as an object on the screen.
Create a general folder “drawable” and put the hdpi size into this folder.
By using a general “drawable” folder, we have fixed the image size regardless of the device screen specification.
Rename the image as “smiley.png”
|

Update your layout file by adding an ImageView object.
|
<?xml version="1.0" encoding="utf-8"?>
<LinearLayout xmlns:android="http://schemas.android.com/apk/res/android"
android:orientation="vertical"
android:layout_width="match_parent"
android:layout_height="match_parent"
android:gravity="center_horizontal"
>
<ImageView
android:layout_width="wrap_content"
android:layout_height="wrap_content"
android:src="@drawable/smiley"
/>
<TextView
android:layout_width="wrap_content"
android:layout_height="wrap_content"
android:text="MyAndroid"
/>
<LinearLayout xmlns:android="http://schemas.android.com/apk/res/android"
android:orientation="vertical"
android:layout_width="match_parent"
android:layout_height="match_parent"
android:layout_marginLeft="20dp"
android:layout_marginRight="20dp"
>
<Button
android:layout_width="match_parent"
android:layout_height="wrap_content"
android:text="About"
/>
<Button
android:layout_width="match_parent"
android:layout_height="wrap_content"
android:text="Settings"
/>
</LinearLayout>
</LinearLayout>
|
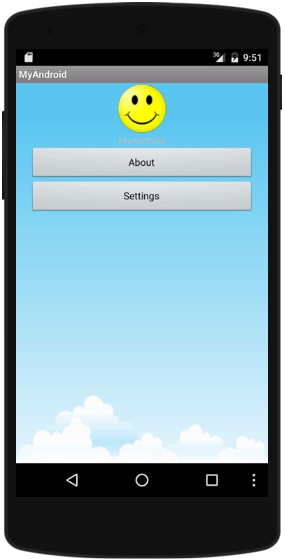
OUTCOME.

3) Layout Background Image
Android allows us to define a background image for a layout.
Download the following image.
Rename it as “bgcloud”.
Put the image into “drawable” folder.
Add a new attribute android:background with the value "@drawable/bgcloud"
|


<?xml version="1.0" encoding="utf-8"?>
<LinearLayout xmlns:android="http://schemas.android.com/apk/res/android"
android:orientation="vertical"
android:layout_width="match_parent"
android:layout_height="match_parent"
android:gravity="center_horizontal"
android:background="@drawable/bgcloud"
>
<ImageView
android:layout_width="wrap_content"
android:layout_height="wrap_content"
android:src="@drawable/smiley"
/>
<TextView
android:layout_width="wrap_content"
android:layout_height="wrap_content"
android:text="MyAndroid"
/>
<LinearLayout xmlns:android="http://schemas.android.com/apk/res/android"
android:orientation="vertical"
android:layout_width="match_parent"
android:layout_height="match_parent"
android:layout_marginLeft="20dp"
android:layout_marginRight="20dp"
>
<Button
android:layout_width="match_parent"
android:layout_height="wrap_content"
android:text="About"
/>
<Button
android:layout_width="match_parent"
android:layout_height="wrap_content"
android:text="Settings"
/>
</LinearLayout>
</LinearLayout>
|
OUTCOME.

No comments:
Post a Comment