.
MyLearningApps
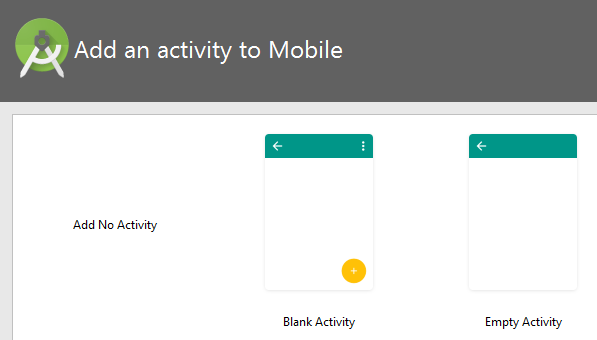
The first three template activities shown in the Android Studio New Project Wizard are “No Activity”, “Blank Activity” and “Empty Activity”.
In simple words, “Activity” is a screen that you see on Android Device.
“Empty Activity” provides basic files to start the project with minimum codes.
“Blank Activity” adds option menu and floating bar to the project.
This tutorial will help you to manually build a Blank Activity project from Empty Activity project.
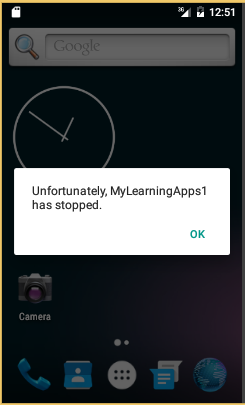
You will encounter a number of errors throughout the steps. Follow the guides to fix them one by one.
Most of the beginners do not like to see errors but in reality you can’t escape from it. So, be prepared to face and fix them!
|
1) Startup
Continue from the previous tutorial or download startup file.
2) Create an additional layout.
Create a new layout file, content_main.xml
Move the content of activity_main.xml to content_main.xml

File Name: content_main.xml
<?xml version="1.0" encoding="utf-8"?>
<RelativeLayout xmlns:android="http://schemas.android.com/apk/res/android"
xmlns:tools="http://schemas.android.com/tools"
xmlns:app="http://schemas.android.com/apk/res-auto"
android:layout_width="match_parent"
android:layout_height="match_parent"
android:paddingLeft="@dimen/activity_horizontal_margin"
android:paddingRight="@dimen/activity_horizontal_margin"
android:paddingTop="@dimen/activity_vertical_margin"
android:paddingBottom="@dimen/activity_vertical_margin"
app:layout_behavior="@string/appbar_scrolling_view_behavior"
tools:context=".MainActivity">
<TextView android:text="Hello World!"
android:layout_width="wrap_content"
android:layout_height="wrap_content" />
</RelativeLayout>
|
3) Edit activity_main.xml
Put the following codes to activity_main.
File Name: activity_main.xml
<?xml version="1.0" encoding="utf-8"?>
<android.support.design.widget.CoordinatorLayout
xmlns:android="http://schemas.android.com/apk/res/android"
xmlns:app="http://schemas.android.com/apk/res-auto"
xmlns:tools="http://schemas.android.com/tools" android:layout_width="match_parent"
android:layout_height="match_parent" android:fitsSystemWindows="true"
tools:context=".MainActivity">
<android.support.design.widget.AppBarLayout android:layout_height="wrap_content"
android:layout_width="match_parent"android:theme="@style/AppTheme.AppBarOverlay">
<android.support.v7.widget.Toolbar android:id="@+id/toolbar"
android:layout_width="match_parent" android:layout_height="?attr/actionBarSize"
android:background="?attr/colorPrimary"app:popupTheme="@style/AppTheme.PopupOverlay" />
</android.support.design.widget.AppBarLayout>
<include layout="@layout/content_main" />
<android.support.design.widget.FloatingActionButton android:id="@+id/fab"
android:layout_width="wrap_content" android:layout_height="wrap_content"
android:layout_gravity="bottom|end" android:layout_margin="@dimen/fab_margin"
android:src="@android:drawable/ic_dialog_email" />
</android.support.design.widget.CoordinatorLayout>
|
4) Edit MainActivity.java
Turn on “Show Line Numbers” to help you identify each line easily.
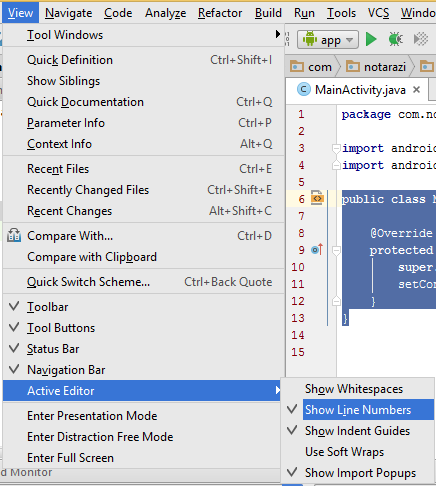
Your original MainActivity.java contains the following codes:
public class MainActivity extends AppCompatActivity {
@Override
protected void onCreate(Bundle savedInstanceState) {
super.onCreate(savedInstanceState);
setContentView(R.layout.activity_main);
}
}
|
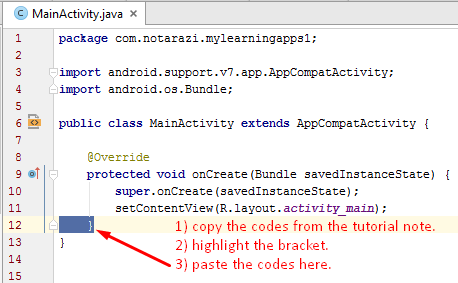
We will add additional codes to the section shown below. Pay attention to the line to avoid mistakes.

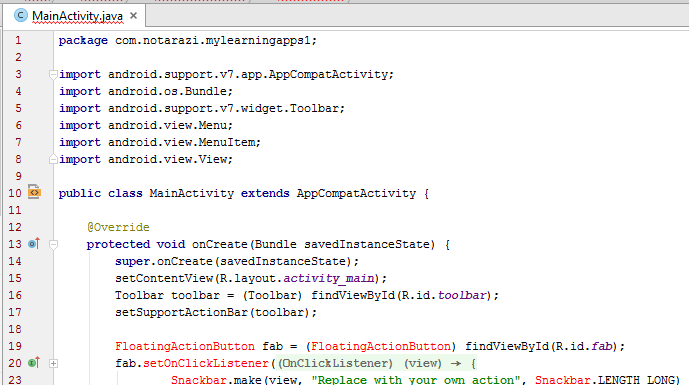
Your edited MainActivity.java should look like below:
public class MainActivity extends AppCompatActivity {
@Override
protected void onCreate(Bundle savedInstanceState) {
super.onCreate(savedInstanceState);
setContentView(R.layout.activity_main);
Toolbar toolbar = (Toolbar) findViewById(R.id.toolbar);
setSupportActionBar(toolbar);
FloatingActionButton fab = (FloatingActionButton) findViewById(R.id.fab);
fab.setOnClickListener(new View.OnClickListener() {
@Override
public void onClick(View view) {
Snackbar.make(view, "Replace with your own action", Snackbar.LENGTH_LONG)
.setAction("Action", null).show();
}
});
}
@Override
public boolean onCreateOptionsMenu(Menu menu) {
// Inflate the menu; this adds items to the action bar if it is present.
getMenuInflater().inflate(R.menu.menu_main, menu);
return true;
}
@Override
public boolean onOptionsItemSelected(MenuItem item) {
// Handle action bar item clicks here. The action bar will
// automatically handle clicks on the Home/Up button, so long
// as you specify a parent activity in AndroidManifest.xml.
int id = item.getItemId();
//noinspection SimplifiableIfStatement
if (id == R.id.action_settings) {
return true;
}
return super.onOptionsItemSelected(item);
}
}
|
Android Studio will automatically detect the libraries needed by your codes.
However, there are situations where some codes could not be recognized.
It could be that the existing libraries do not support the codes.
5) Edit build.gradle (Module:app)
You need to add additional module to support the new codes.
|

File Name: build.gradle (Module:app)
apply plugin: 'com.android.application'
android {
compileSdkVersion 23
buildToolsVersion "23.0.1"
defaultConfig {
applicationId "com.notarazi.mylearningapps1"
minSdkVersion 14
targetSdkVersion 23
versionCode 1
versionName "1.0"
}
buildTypes {
release {
minifyEnabled false
proguardFiles getDefaultProguardFile('proguard-android.txt'), 'proguard-rules.pro'
}
}
}
dependencies {
compile fileTree(dir: 'libs', include: ['*.jar'])
testCompile 'junit:junit:4.12'
compile 'com.android.support:appcompat-v7:23.1.0'
compile 'com.android.support:design:23.1.0'
}
|
6) Synchronize project
Click “Sync Now” button to synchronize the project codes after the new module has been added.
|

7) Fixing Errors
Find the red colored codes in MainActivity.java, click the text and press ALT+ENTER.
If the new module supports your code, Android Studio should be able to recommend cod fixes.
|
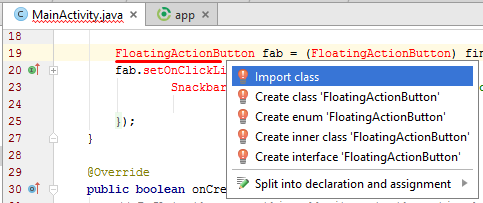
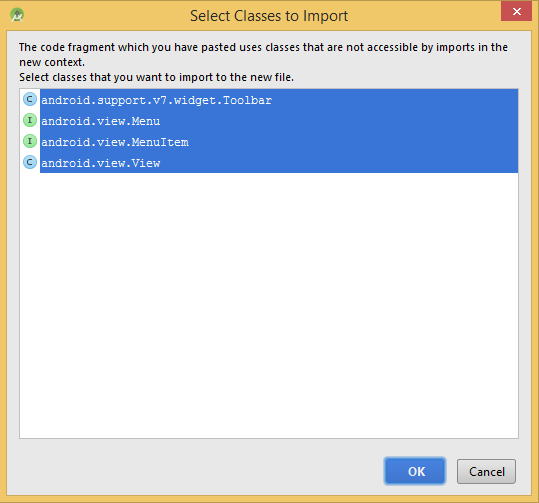
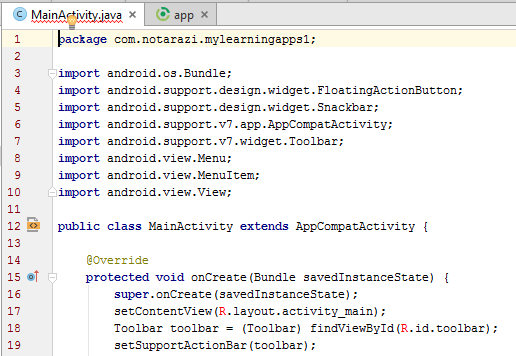
Select the “import class” option.
Now, some errors are gone. But you still get error for R.
This error suggests that there could be problems with Resource files. It could be originating from activity_main.
Open the file to seek more clues.
|

If you type ALT+ENTER, you may get a recommendation to add a style value.
|

Open the style value file , res/values/styles.xml
We may need to add more definition here in order to fix the error.
|
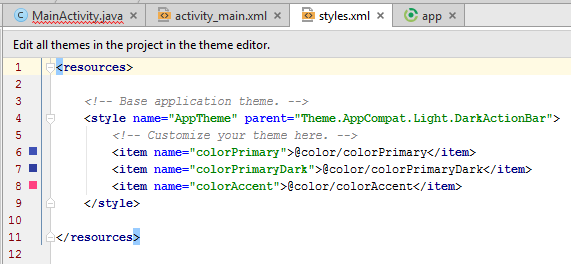
Edit the file as follows
File Name: res/values/styles.xml
<resources>
<!-- Base application theme. -->
<style name="AppTheme" parent="Theme.AppCompat.Light.DarkActionBar">
<!-- Customize your theme here. -->
<item name="colorPrimary">@color/colorPrimary</item>
<item name="colorPrimaryDark">@color/colorPrimaryDark</item>
<item name="colorAccent">@color/colorAccent</item>
</style>
<style name="AppTheme.NoActionBar">
<item name="windowActionBar">false</item>
<item name="windowNoTitle">true</item>
</style>
<style name="AppTheme.AppBarOverlay" parent="ThemeOverlay.AppCompat.Dark.ActionBar"/>
<style name="AppTheme.PopupOverlay" parent="ThemeOverlay.AppCompat.Light" />
</resources>
|
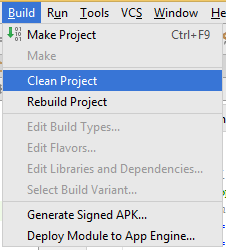
Every time you change codes, make a practice to clean your codes.
Go to menu, select Build/Clean Project.
|
Check if there is some more errors to fix.

File Name: res/values/dimens.xml
<resources>
<!-- Default screen margins, per the Android Design guidelines. -->
<dimen name="activity_horizontal_margin">16dp</dimen>
<dimen name="activity_vertical_margin">16dp</dimen>
<dimen name="fab_margin">16dp</dimen>
</resources>
|
Any more errors?
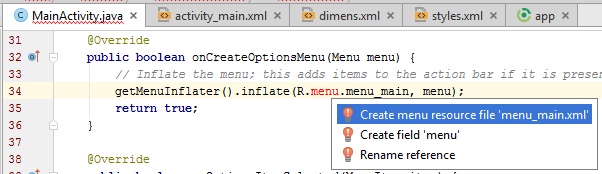
You need to create a new folder “menu” under “res”.

And then add definitions for menu_main.
File Name: res/menu/menu_main.xml
<menu xmlns:android="http://schemas.android.com/apk/res/android"
xmlns:app="http://schemas.android.com/apk/res-auto"
xmlns:tools="http://schemas.android.com/tools" tools:context=".MainActivity">
<item android:id="@+id/action_settings" android:title="@string/action_settings"
android:orderInCategory="100" app:showAsAction="never" />
</menu>
|
Any more errors?
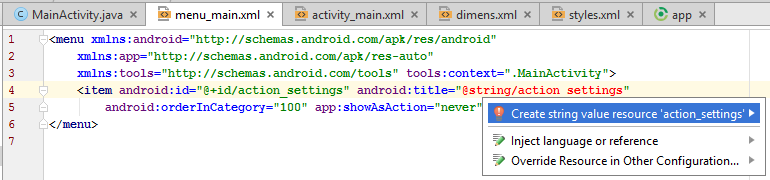
File Name: res/values/strings.xml
<resources>
<string name="app_name">MyLearningApps1</string>
<string name="action_settings">Settings</string>
</resources>
|
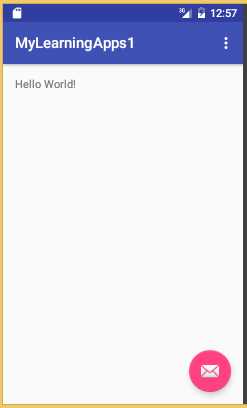
If you manage to fix all of the above errors, you code would at last be error-free.
Run your project to see the outcome.

Read the “error” log messages.

Caused by: java.lang.IllegalStateException: This Activity already has an action bar supplied by the window decor. Do not request Window.FEATURE_SUPPORT_ACTION_BAR and set windowActionBar to false in your theme to use a Toolbar instead.
|
At this stage, your code-fixing process becomes more challenging.
You need to figure out something based on the error message given by the device.
Some times, prior experiences or knowledge sharing in Stack Exchange Forum may be helpful.
|
One of the solution is to edit your manifest file.
File Name: AndroidManifest.xml
<?xml version="1.0" encoding="utf-8"?>
<manifest xmlns:android="http://schemas.android.com/apk/res/android"
package="com.notarazi.mylearningapps1" >
<application
android:allowBackup="true"
android:icon="@mipmap/ic_launcher"
android:label="@string/app_name"
android:supportsRtl="true"
android:theme="@style/AppTheme" >
<activity android:name=".MainActivity"
android:theme="@style/AppTheme.NoActionBar" >
<intent-filter>
<action android:name="android.intent.action.MAIN" />
<category android:name="android.intent.category.LAUNCHER" />
</intent-filter>
</activity>
</application>
</manifest>
|
DOWNLOAD:
No comments:
Post a Comment