
.
103 Android Studio Building Simple UI
This tutorial is based on http://developer.android.com/training/basics/firstapp/building-ui.html ..
The tutorial was done with Android Studio 1.4.
1) START UP
Follow previous tutorial or download startup project.
2) LAYOUT FILE
Recall from the previous tutorial, layout file (activity_main) defines the user interface that you see on the screen.
File Name: res/layout/activity_main.xml
<?xml version="1.0" encoding="utf-8"?>
<RelativeLayout
xmlns:android="http://schemas.android.com/apk/res/android"
xmlns:tools="http://schemas.android.com/tools"
android:layout_width="match_parent"
android:layout_height="match_parent"
android:paddingLeft="@dimen/activity_horizontal_margin"
android:paddingRight="@dimen/activity_horizontal_margin"
android:paddingTop="@dimen/activity_vertical_margin"
android:paddingBottom="@dimen/activity_vertical_margin"
tools:context=".MainActivity">
<TextView android:text="Hello World!" android:layout_width="wrap_content"
android:layout_height="wrap_content" />
</RelativeLayout>
|
The codes above highlights two important tags.
<?xml …>
<RelativeLayout …>
<TextView .../>
</RelativeLayout>
|
The TextView is an example of a View Object.
The RelativeLayout is an example of ViewGroup. The ViewGroup may contain another ViewGroup or Group.
3) RELATIONAL LAYOUT
Add an EditText object
File Name: res/layout/activity_main.xml
<?xml version="1.0" encoding="utf-8"?>
<RelativeLayout
xmlns:android="http://schemas.android.com/apk/res/android"
xmlns:tools="http://schemas.android.com/tools"
android:layout_width="match_parent"
android:layout_height="match_parent"
android:paddingLeft="@dimen/activity_horizontal_margin"
android:paddingRight="@dimen/activity_horizontal_margin"
android:paddingTop="@dimen/activity_vertical_margin"
android:paddingBottom="@dimen/activity_vertical_margin"
tools:context=".MainActivity">
<TextView android:text="Name:" android:layout_width="wrap_content"
android:layout_height="wrap_content" />
<EditText android:id="@+id/edit_message"
android:layout_width="wrap_content"
android:layout_height="wrap_content"
android:hint="Type name here..." />
</RelativeLayout>
|
Switch from TEXT mode to DESIGN mode.
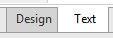
You see the layout outcome as below. Both of the TextView and EditText objects are stacked together.
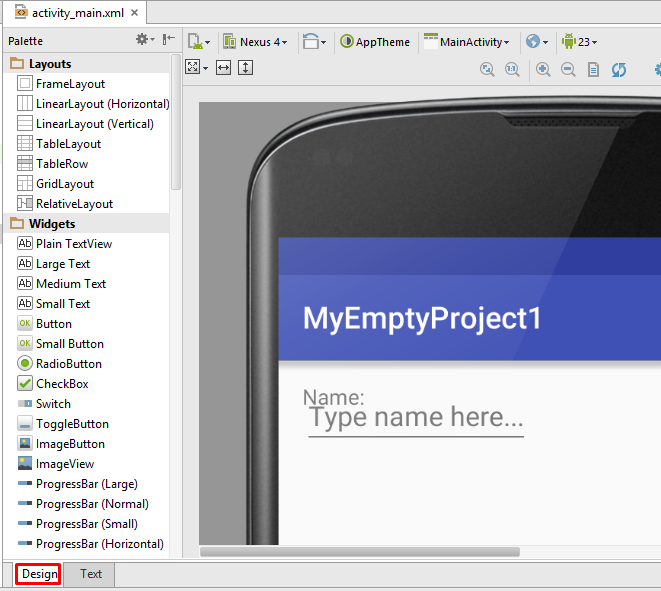
Why is that so?
Because our codes do not tell how the objects are supposed to be arranged relative to each other. As a result they were stacked to the top left of the screen.

4) LINEAR LAYOUT
To avoid stacked effects, we use another View Object called Linear Layout.
Linear Layout arranges the objects in either horizontal or vertical orientation.

Edit the codes as follows.
File Name: res/layout/activity_main.xml
<?xml version="1.0" encoding="utf-8"?>
<LinearLayout xmlns:android="http://schemas.android.com/apk/res/android"
xmlns:tools="http://schemas.android.com/tools"
android:layout_width="match_parent"
android:layout_height="match_parent"
android:paddingLeft="@dimen/activity_horizontal_margin"
android:paddingRight="@dimen/activity_horizontal_margin"
android:paddingTop="@dimen/activity_vertical_margin"
android:paddingBottom="@dimen/activity_vertical_margin"
tools:context=".MainActivity"
android:orientation="vertical">
<TextView
android:text="Name:"
android:layout_width="wrap_content"
android:layout_height="wrap_content" />
<EditText android:id="@+id/edit_message"
android:layout_width="wrap_content"
android:layout_height="wrap_content"
android:hint="Type name here..." />
</LinearLayout>
|
You get a linear vertical view.

Now edit the codes again. This time use “horizontal”.
File Name: res/layout/activity_main.xml
<?xml version="1.0" encoding="utf-8"?>
<LinearLayout xmlns:android="http://schemas.android.com/apk/res/android"
xmlns:tools="http://schemas.android.com/tools"
android:layout_width="match_parent"
android:layout_height="match_parent"
android:paddingLeft="@dimen/activity_horizontal_margin"
android:paddingRight="@dimen/activity_horizontal_margin"
android:paddingTop="@dimen/activity_vertical_margin"
android:paddingBottom="@dimen/activity_vertical_margin"
tools:context=".MainActivity"
android:orientation="horizontal">
<TextView
android:text="Name:"
android:layout_width="wrap_content"
android:layout_height="wrap_content" />
<EditText android:id="@+id/edit_message"
android:layout_width="wrap_content"
android:layout_height="wrap_content"
android:hint="Type name here..." />
</LinearLayout>
|
You get a linear horizontal view instead.
5) VIEW OBJECTS
So far we have seen Text View and Edit Text Objects.
Let’s add another object ie a button.
File Name: res/layout/activity_main.xml
<?xml version="1.0" encoding="utf-8"?>
<LinearLayout
xmlns:android="http://schemas.android.com/apk/res/android"
xmlns:tools="http://schemas.android.com/tools"
android:layout_width="match_parent"
android:layout_height="match_parent"
android:paddingLeft="@dimen/activity_horizontal_margin"
android:paddingRight="@dimen/activity_horizontal_margin"
android:paddingTop="@dimen/activity_vertical_margin"
android:paddingBottom="@dimen/activity_vertical_margin"
tools:context=".MainActivity"
android:orientation="horizontal">
<TextView
android:text="Name:"
android:layout_width="wrap_content"
android:layout_height="wrap_content" />
<EditText
android:id="@+id/edit_message"
android:layout_width="wrap_content"
android:layout_height="wrap_content"
android:hint="Type name here..." />
<Button
android:layout_width="wrap_content"
android:layout_height="wrap_content"
android:text="Send" />
</LinearLayout>
|
.
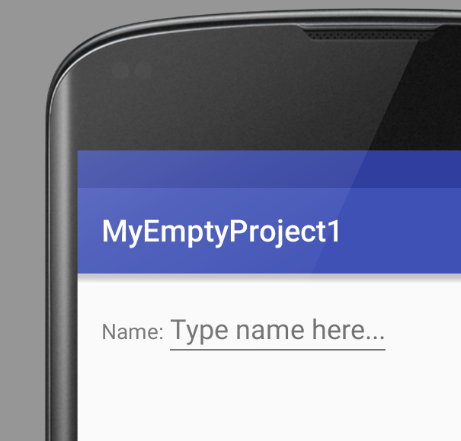
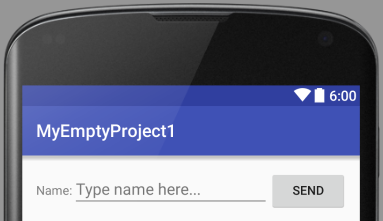
All objects are arranged sequentially from top left corner.
It works as expected. But less aesthetic.

We can eliminate the extra space by increasing the width of the Edit Text object.
However we cannot set fix values to the Edit Text object because we don’t know the width of the screen. Besides that, there are many variations of Android Device screen and one fixed value certainly doesn’t work for all screen sizes.
One of the solutions is to tell Android to adjust the width of Edit Text during run time.
File Name: res/layout/activity_main.xml
<?xml version="1.0" encoding="utf-8"?>
<LinearLayout
xmlns:android="http://schemas.android.com/apk/res/android"
xmlns:tools="http://schemas.android.com/tools"
android:layout_width="match_parent"
android:layout_height="match_parent"
android:paddingLeft="@dimen/activity_horizontal_margin"
android:paddingRight="@dimen/activity_horizontal_margin"
android:paddingTop="@dimen/activity_vertical_margin"
android:paddingBottom="@dimen/activity_vertical_margin"
tools:context=".MainActivity"
android:orientation="horizontal">
<TextView
android:text="Name:"
android:layout_width="wrap_content"
android:layout_height="wrap_content" />
<EditText
android:id="@+id/edit_message"
android:layout_width="0dp"
android:layout_weight="1"
android:layout_height="wrap_content"
android:hint="Type name here..." />
<Button
android:layout_width="wrap_content"
android:layout_height="wrap_content"
android:text="Send" />
</LinearLayout>
|
.
We get a better look now.
CONCLUSION
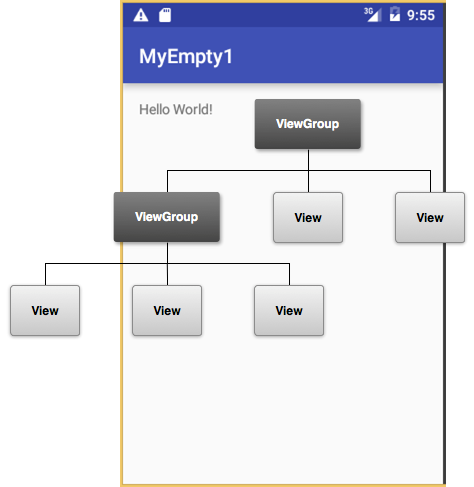
The graphical user interface for an Android app is built using a hierarchy of View andViewGroup objects. View objects are usually UI widgets such as buttons or text fields.ViewGroup objects are invisible view containers that define how the child views are laid out, such as in a grid or a vertical list.
|
DOWNLOAD
No comments:
Post a Comment