This tutorial is a continuation of http://android-steps.blogspot.com/2014/02/android-eclipse-building-simple-user.html.
The steps is based on http://developer.android.com/training/basics/firstapp/starting-activity.html. In this lesson, you’ll add some code to MainActivity that starts a new activity when the user clicks the Send button.
1) Run Eclipse and open MyFirstApp project.
2) Adding respond to button.
2.1) To respond to the button's on-click event, open the {project root|/res/layout/activity_main.xml layout file and add the android:onClick attribute to the <Button> element:
2.1) To respond to the button's on-click event, open the {project root|/res/layout/activity_main.xml layout file and add the android:onClick attribute to the <Button> element:

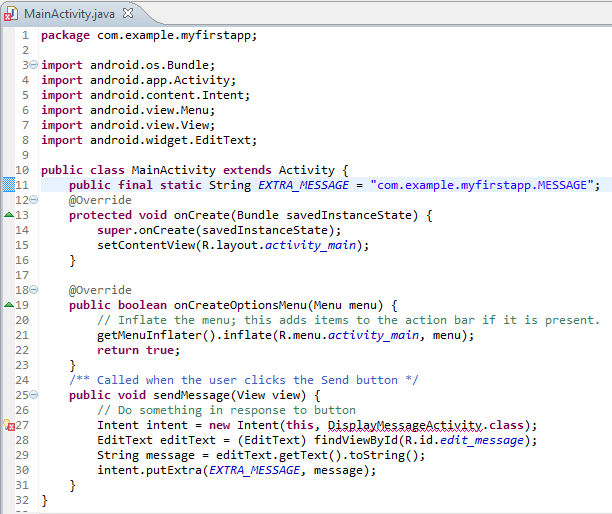
2.2) Open the {project root}/src/com.example.myfirstapp/MainActivity.java and add the corresponding method (refer line no. 21-24)
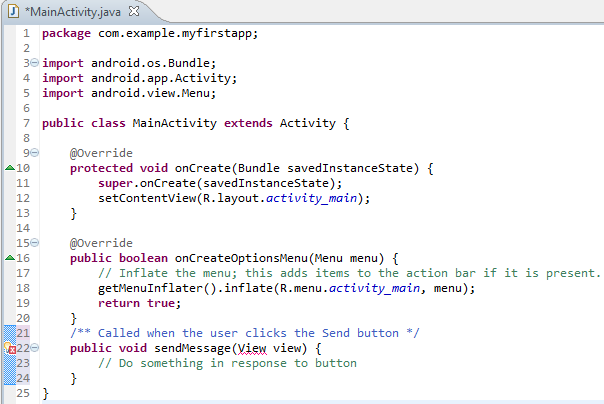
2.3) This requires that you import the View class (refer line no. 6)

3) Build an Intent
3.1) An Intent is an object that provides runtime binding between separate components (such as two activities). The Intent represents an app’s "intent to do something." You can use intents for a wide variety of tasks, but most often they’re used to start another activity.
3.1) An Intent is an object that provides runtime binding between separate components (such as two activities). The Intent represents an app’s "intent to do something." You can use intents for a wide variety of tasks, but most often they’re used to start another activity.
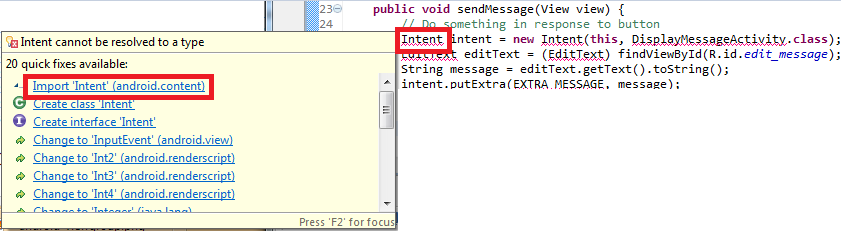
3.2) Inside the sendMessage() method, create an Intent to start an activity called DisplayMessageActivity:

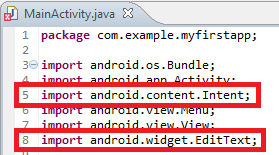
3.3) You need to import statements for android.content.Intent and android.widget.EditText. Refer line no.5 and 8.
3.4) Add the EXTRA_MESSAGE definition to the top of the MainActivity class. Refer line no. 11.
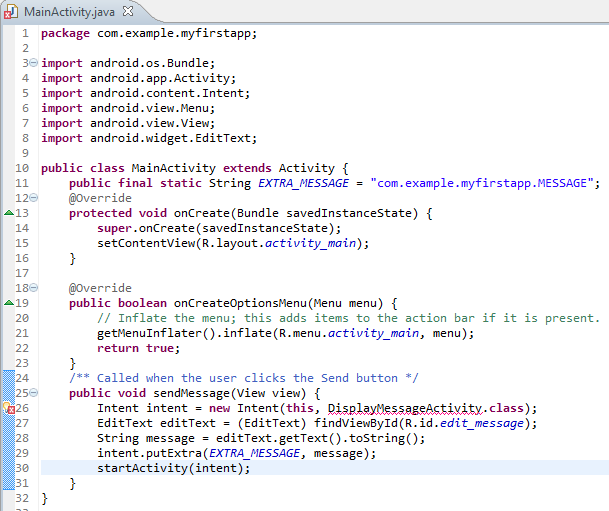
4) Start the Second Activity
4.1) To start an activity, call startActivity() and pass it your Intent. The system receives this call and starts an instance of the Activity specified by the Intent. Refer line no. 30.
4.1) To start an activity, call startActivity() and pass it your Intent. The system receives this call and starts an instance of the Activity specified by the Intent. Refer line no. 30.
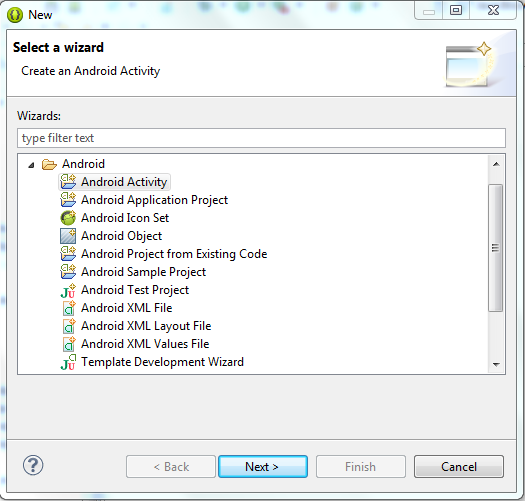
5) Create the Second Activity
5.1) Click New in the toolbar.
5.1) Click New in the toolbar.

5.2) Select Android Activity. Click Next.
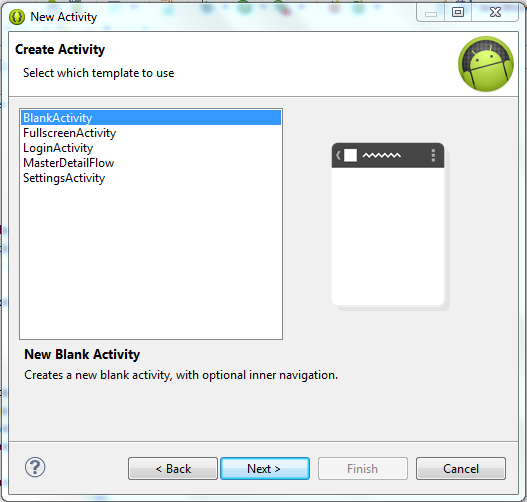
5.3) Select Blank Activity. Click Next.
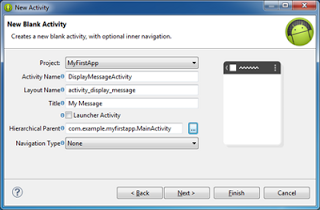
5.4) Fill-in the details. Click Finish.
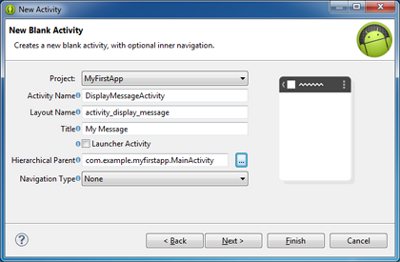
5.5) Check DisplayMessageActivity Class.
package com.example.myfirstapp;
import android.os.Build;
import android.os.Bundle;
import android.annotation.SuppressLint;
import android.app.Activity;
import android.content.Intent;
import android.view.Menu;
import android.view.MenuItem;
import android.widget.TextView;
import android.support.v4.app.NavUtils;
public class DisplayMessageActivity extends Activity {
@SuppressLint("NewApi")
@Override
protected void onCreate(Bundle savedInstanceState) {
super.onCreate(savedInstanceState);
setContentView(R.layout.activity_display_message);
// Make sure we're running on Honeycomb or higher to use ActionBar APIs
if (Build.VERSION.SDK_INT >= Build.VERSION_CODES.HONEYCOMB) {
// Show the Up button in the action bar.
getActionBar().setDisplayHomeAsUpEnabled(true);
}
// Get the message from the intent
Intent intent = getIntent();
String message = intent.getStringExtra(MainActivity.EXTRA_MESSAGE);
// Create the text view
TextView textView = new TextView(this);
textView.setTextSize(40);
textView.setText(message);
// Set the text view as the activity layout
setContentView(textView);
}
@Override
public boolean onCreateOptionsMenu(Menu menu) {
// Inflate the menu; this adds items to the action bar if it is present.
getMenuInflater().inflate(R.menu.activity_display_message, menu);
return true;
}
@Override
public boolean onOptionsItemSelected(MenuItem item) {
switch (item.getItemId()) {
case android.R.id.home:
// This ID represents the Home or Up button. In the case of this
// activity, the Up button is shown. Use NavUtils to allow users
// to navigate up one level in the application structure. For
// more details, see the Navigation pattern on Android Design:
//
// http://developer.android.com/design/patterns/navigation.html#up-vs-back
//
NavUtils.navigateUpFromSameTask(this);
return true;
}
return super.onOptionsItemSelected(item);
}
}
5.6) Check Manifest.xml
<?xml version="1.0" encoding="utf-8"?>
<manifest xmlns:android="http://schemas.android.com/apk/res/android"
package="com.example.myfirstapp"
android:versionCode="1"
android:versionName="1.0" >
<uses-sdk
android:minSdkVersion="8"
android:targetSdkVersion="17" />
<application
android:allowBackup="true"
android:icon="@drawable/ic_launcher"
android:label="@string/app_name"
android:theme="@style/AppTheme" >
<activity
android:name="com.example.myfirstapp.MainActivity"
android:label="@string/app_name" >
<intent-filter>
<action android:name="android.intent.action.MAIN" />
<category android:name="android.intent.category.LAUNCHER" />
</intent-filter>
</activity>
<activity
android:name="com.example.myfirstapp.DisplayMessageActivity"
android:label="@string/title_activity_display_message"
android:parentActivityName="com.example.myfirstapp.MainActivity" >
<meta-data
android:name="android.support.PARENT_ACTIVITY"
android:value="com.example.myfirstapp.MainActivity" />
</activity>
</application>
</manifest>
5.7) Check String.xml
<?xml version="1.0" encoding="utf-8"?>
<resources>
<string name="app_name">My First App</string>
<string name="edit_message">Enter a message</string>
<string name="button_send">Send</string>
<string name="menu_settings">Settings</string>
<string name="title_activity_main">MainActivity</string>
<string name="hello_world">Hello world!</string>
<string name="title_activity_display_message">My Message</string>
</resources>
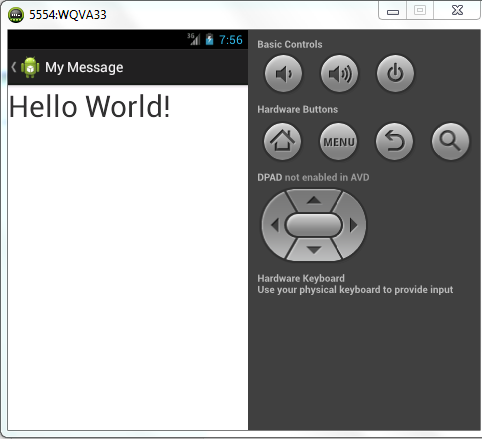
6) Test run
6.1) Type "Hello World!"
6.1) Type "Hello World!"

6.2) Observe the response.
No comments:
Post a Comment