.
101 MySuperHero Android SplashScreen and StartActivity
0) Starting Up
Continue from the previous tutorial or download startup files.
1) Adding a button to the layout
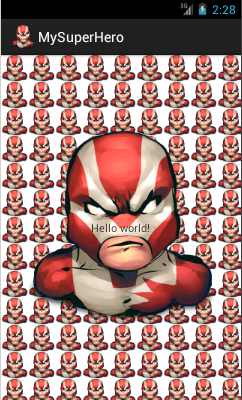
File: res/layout/activity_splash.xml
<RelativeLayout
xmlns:android="http://schemas.android.com/apk/res/android"
xmlns:tools="http://schemas.android.com/tools"
android:layout_width="match_parent"
android:layout_height="match_parent"
android:background="@drawable/repeatsuperherosmall"
tools:context=".SplashActivity" >
<ImageView
android:layout_width="wrap_content"
android:layout_height="wrap_content"
android:background="@drawable/superhero"
android:layout_centerHorizontal="true"
android:layout_centerVertical="true"
/>
<TextView
android:layout_width="wrap_content"
android:layout_height="wrap_content"
android:layout_centerHorizontal="true"
android:layout_centerVertical="true"
android:text="@string/hello_world" />
<Button
android:layout_width="match_parent"
android:layout_height="wrap_content"
android:layout_alignParentBottom="true"
android:layout_marginBottom="10dp"
android:text="See My Hero"
android:layout_centerHorizontal="true"
android:textColor="#ffffff"
android:background="#A21616"/>
</RelativeLayout>
|
OUTCOME.

2) Add a new activity SuperHeroesActivity


Type a name SuperHeroesActivity.

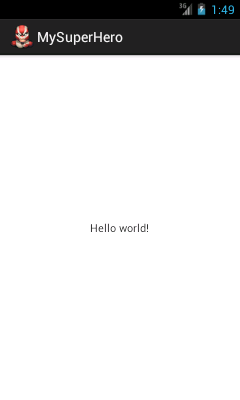
Check that you get the following files generated.
|
2.1) Layout File
File:res/layout/activity_super_heroes.xml
<RelativeLayout xmlns:android="http://schemas.android.com/apk/res/android"
xmlns:tools="http://schemas.android.com/tools"
android:layout_width="match_parent"
android:layout_height="match_parent"
tools:context=".SuperHeroesActivity" >
<TextView
android:layout_width="wrap_content"
android:layout_height="wrap_content"
android:layout_centerHorizontal="true"
android:layout_centerVertical="true"
android:text="@string/hello_world" />
</RelativeLayout>
|
2.2) Controller File
File: SuperHeroesActivity.java
package com.example.mysuperhero;
import android.os.Bundle;
import android.app.Activity;
import android.view.Menu;
public class SuperHeroesActivity extends Activity {
@Override
protected void onCreate(Bundle savedInstanceState) {
super.onCreate(savedInstanceState);
setContentView(R.layout.activity_super_heroes);
}
@Override
public boolean onCreateOptionsMenu(Menu menu) {
// Inflate the menu; this adds items to the action bar if it is present.
getMenuInflater().inflate(R.menu.activity_super_heroes, menu);
return true;
}
}
|
3) Switch from Splash To SuperHeroes Activity
Assign onClick=showSuperHeroes attribute to Splash Layout.
Add showSuperHeroes() method in Splash Controller.
Use StartActivity to start the SuperHeroesActivity.
|
3.1) Add Button onClick attribute to Layout
File: res/layout/activity_splash.xml
<RelativeLayout xmlns:android="http://schemas.android.com/apk/res/android"
xmlns:tools="http://schemas.android.com/tools"
android:layout_width="match_parent"
android:layout_height="match_parent"
android:background="@drawable/repeatsuperherosmall"
tools:context=".SplashActivity" >
<ImageView
android:layout_width="wrap_content"
android:layout_height="wrap_content"
android:background="@drawable/superhero"
android:layout_centerHorizontal="true"
android:layout_centerVertical="true"
/>
<TextView
android:layout_width="wrap_content"
android:layout_height="wrap_content"
android:layout_centerHorizontal="true"
android:layout_centerVertical="true"
android:text="@string/hello_world" />
<Button
android:layout_width="match_parent"
android:layout_height="wrap_content"
android:layout_alignParentBottom="true"
android:layout_marginBottom="10dp"
android:text="See My Hero"
android:layout_centerHorizontal="true"
android:textColor="#ffffff"
android:background="#A21616"
android:onClick="showSuperHeroes" />
</RelativeLayout>
|
3.2) Add method showSuperHeroes to Controller
File: SplashActivity.java
package com.example.mysuperhero;
import android.os.Bundle;
import android.app.Activity;
import android.content.Intent;
import android.view.Menu;
import android.view.View;
public class SplashActivity extends Activity {
@Override
protected void onCreate(Bundle savedInstanceState) {
super.onCreate(savedInstanceState);
setContentView(R.layout.activity_splash);
}
@Override
public boolean onCreateOptionsMenu(Menu menu) {
// Inflate the menu; this adds items to the action bar if it is present.
getMenuInflater().inflate(R.menu.activity_splash, menu);
return true;
}
public void showSuperHeroes (View v){
startActivity(new Intent(SplashActivity.this,SuperHeroesActivity.class));
finish();
}
}
|


4) Auto Switching Using Delay
Besides the button clicks, we can program the apps to automatically start the SuperHeroesActivity after certain time delay.
We declare a method setNextActivity() and define a handler to run the delay process.
We also add a statement to cancel this handler if the user clicks the button.
|
File: SplashActivity.java
package com.example.mysuperhero;
import android.os.Bundle;
import android.os.Handler;
import android.app.Activity;
import android.content.Intent;
import android.view.Menu;
import android.view.View;
import android.widget.Toast;
public class SplashActivity extends Activity {
@Override
protected void onCreate(Bundle savedInstanceState) {
super.onCreate(savedInstanceState);
setContentView(R.layout.activity_splash);
setNextActivity();
}
@Override
public boolean onCreateOptionsMenu(Menu menu) {
// Inflate the menu; this adds items to the action bar if it is present.
getMenuInflater().inflate(R.menu.activity_splash, menu);
return true;
}
public void showSuperHeroes (View v){
startActivity(new Intent(SplashActivity.this,SuperHeroesActivity.class));
/** Cancel delay handler **/
handler1.removeCallbacksAndMessages(null);
finish();
}
private void setNextActivity(){
handler1.postDelayed(new Runnable() {
// Using handler with postDelayed called runnable run method
@Override
public void run() {
//display in short period of time
//Toast.makeText(getApplicationContext(), "Ending now...", Toast.LENGTH_SHORT).show();
startActivity(new Intent(SplashActivity.this,SuperHeroesActivity.class));
finish();
}
}, 5*1000); // wait for 5 seconds
}
}
|
5) Creating Full Screen
Splash Screen normally occupies the whole screen.
Add statements to set Full Screen mode.
|
package com.example.mysuperhero;
import android.os.Bundle;
import android.os.Handler;
import android.app.Activity;
import android.content.Intent;
import android.view.Menu;
import android.view.View;
import android.view.Window;
import android.view.WindowManager;
public class SplashActivity extends Activity {
Handler handler1=new Handler();
@Override
protected void onCreate(Bundle savedInstanceState) {
super.onCreate(savedInstanceState);
/** Hiding Title bar of this activity screen */
getWindow().requestFeature(Window.FEATURE_NO_TITLE);
/** Making this activity, full screen */
getWindow().setFlags(WindowManager.LayoutParams.FLAG_FULLSCREEN,
WindowManager.LayoutParams.FLAG_FULLSCREEN);
/** Sets a layout for this activity */
setContentView(R.layout.activity_splash);
/** Set delay time and call next activity */
setNextActivity();
}
@Override
public boolean onCreateOptionsMenu(Menu menu) {
// Inflate the menu; this adds items to the action bar if it is present.
getMenuInflater().inflate(R.menu.activity_splash, menu);
return true;
}
public void showSuperHeroes (View v){
startActivity(new Intent(SplashActivity.this,SuperHeroesActivity.class));
/** Cancel delay handler **/
handler1.removeCallbacksAndMessages(null);
finish();
}
private void setNextActivity(){
handler1.postDelayed(new Runnable() {
// Using handler with postDelayed called runnable run method
@Override
public void run() {
//display in short period of time
//Toast.makeText(getApplicationContext(), "Ending now...", Toast.LENGTH_SHORT).show();
startActivity(new Intent(SplashActivity.this,SuperHeroesActivity.class));
finish();
}
}, 5*1000); // wait for 5 seconds
}
}
|
6) Getting Rid Of Blank White Screen On Start Up
You may notice that there is a white blank screen that appears a short while before our SplashActivity comes out.
To get rid of this, add custom theme “splashscreen” to customize the settings.
|

File: res/values/styles.xml
<resources>
<!--
Base application theme, dependent on API level. This theme is replaced
by AppBaseTheme from res/values-vXX/styles.xml on newer devices.
-->
<style name="AppBaseTheme" parent="android:Theme.Light">
<!--
Theme customizations available in newer API levels can go in
res/values-vXX/styles.xml, while customizations related to
backward-compatibility can go here.
-->
</style>
<!-- Application theme. -->
<style name="AppTheme" parent="AppBaseTheme">
<!-- All customizations that are NOT specific to a particular API-level can go here. -->
</style>
<style name="SplashScreen">
<item name="android:padding">0dp</item>
<item name="android:windowBackground">@android:color/black</item>
<item name="android:windowFrame">@null</item>
</style>
</resources>
|
AndroidManifest.xml
<?xml version="1.0" encoding="utf-8"?>
<manifest xmlns:android="http://schemas.android.com/apk/res/android"
package="com.example.mysuperhero"
android:versionCode="1"
android:versionName="1.0" >
<uses-sdk
android:minSdkVersion="8"
android:targetSdkVersion="17" />
<application
android:allowBackup="true"
android:icon="@drawable/ic_launcher"
android:label="@string/app_name"
android:theme="@style/AppTheme" >
<activity
android:name="com.example.mysuperhero.SplashActivity"
android:theme="@style/SplashScreen"
android:label="@string/app_name" >
<intent-filter>
<action android:name="android.intent.action.MAIN" />
<category android:name="android.intent.category.LAUNCHER" />
</intent-filter>
</activity>
<activity
android:name="com.example.mysuperhero.SuperHeroesActivity"
android:label="@string/title_activity_super_heroes" >
</activity>
</application>
</manifest>
|